Overview
MYMorise — Manage Your Money(MYM) is a desktop application for those who prefer tracking personal expenses on their computers. With MYMorise, you can easily see your daily expenses as well as a summary, along with other useful functionalities. More importantly, MYMorise is optimized for those who prefer to work with Command Line Interface (CLI) while still having the benefits of a Graphical User Interface (GUI) created with JavaFX. It is written in Java, and has about 20 kLoC.
Summary of contributions
-
Major enhancement: added the ability to autocomplete
-
What it does: Similar to the autocomplete feature in modern IDE, user can press key or click on a selected item to autocomplete
-
Justification: This feature improves the product significantly because a user can type faster and no longer need to type exactly the same command word. Autocomplete will do this for you.
-
Highlights: This enhancement affects existing commands and commands to be added in future. It required an in-depth analysis of Javafx component as well as searching logic. The implementation too was challenging because several parts need to be combined together and some checks and fixes are also required towards a bug-free autocomplete feature.
-
-
Minor enhancement: added a history command that allows the user to navigate to previous commands using F3/F4 keys and display history command list.
-
What it does: The history command helps user to trace the commands he/she entered since he/she starts the app. Navigation of history using key is also supported.
-
Justification: This feature improves the product significantly because a user can track his/her input history and navigate to any history command without the need to type again if he/she wants to execute previous command.
-
-
Minor enhancement: rearrange GUI layout and draw piechart for displaying statistics.
-
Code contributed: [Functional code][Test code]
-
Other contributions:
Contributions to the User Guide
Given below are sections I contributed to the User Guide. They showcase my ability to write documentation targeting end-users. |
Introduction
MYMorise — Manage Your Money(MYM) is a desktop application for those who prefer tracking personal expenses on their computers. With MYMorise, you can easily see your daily expenses as well as a summary, along with other useful functionalities. More importantly, MYMorise is optimized for those who prefer to work with Command Line Interface (CLI) while still having the benefits of a Graphical User Interface (GUI). Interested? Jump to the Quick Start to get started. Enjoy!
Quick Start
-
Ensure you have Java
11or above installed in your Computer. -
Download the latest
MYMorise.jar. -
Copy the jar file to the folder you want to use as the home folder for MYMorise.
-
Run
java -jar path_to_folder/MYMorise.jarin your CLI. The GUI should appear in a few seconds.
Autocomplete
Equip with IDE-like autocomplete function for faster input and enables users to quickly fill in command arguments with autocomplete suggestions.
Suggestions include commonly used words in MYMorise and users may customize the suggestion list by changing the
vocabulary.txt
When the user types, if there are suggestions for a certain input, user can press tab to autofill the first suggestion or press DOWN and UP to navigate between suggestions and then press tab or enter to autofill the selected item. User may also just click on an item to autofill.
Retrieve the history of the commands executed: history
Returns the list of history commands executed.
| Press F3 to navigate to previous input; Press F4 to navigate to next input; |
Use keyboard to navigate through the history will only take effect when the focus is in TextField.
|
| UP and DOWN cannot be used here to navigate through the history since they are used to navigate through the autocomplete suggestions. |
Exiting the program : exit
Exits the program.
Format: exit
Saving data
Expense and Budget data are saved in the hard disk automatically after any command that changes the data. There is no need to save manually.
Locating expenses by name: find [coming in v2.0]
Finds all expenses by name, date, tag.
Format: find [n/NAME] [d/DATE] [t/TAG]
Examples:
-
find n/Coffee
ReturnscoffeeandStarbucks Coffee. -
find n/Cheesecake
Returns any expense having namesCheesecake, eg:Strawberry Cheesecake,Blueberry Cheesecake.
Contributions to the Developer Guide
Given below are sections I contributed to the Developer Guide. They showcase my ability to write technical documentation and the technical depth of my contributions to the project. |
AutoComplete Feature
Implementation
Autocomplete is facilitated by several parts.
The logic part is implemented through java.seedu.address.logic.search package which contains AutoComplete and
BinarySearch.
The model is constructed through java.seedu.address.model.autocomplete which contains AutoCompleteModel and Word.
The Ui part is implemented through java.seedu.address.ui.QueryCard on top of CommandBox.
Given below is an example usage scenario and how the autocomplete mechanism behaves at each step. (p.s. details are omitted)
Step 1. The user launches MYMorise and the user will be prompted to enter a command as shown in the command box.
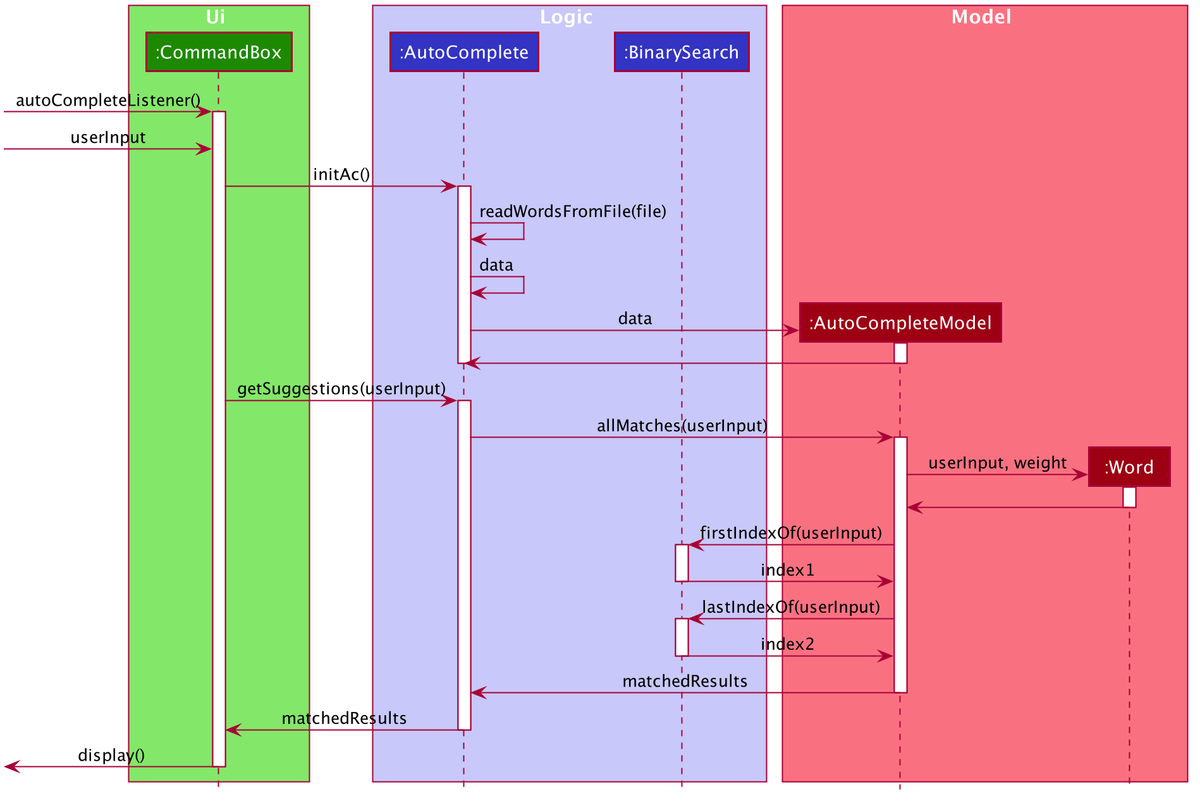
Step 2. User enter a and the listener is triggered. Then AutoComplete#initAc() and
AutoComplete#getSuggestions() is invoked.
Step 3. initAc() calls AutoComplete#readWordsFromFile() which reads the vocabulary from our local dictionary to get
the database and then construct an AutocompleteModel with the vocabulary read.
Step 4. getSuggestions(input) calls AutocompleteModel#allMatches() which utilises the improved version of binary
search algorithm BinarySearch. The algorithm will return the first and last index of potential matched results.
Since the result is based on a pre-order for sorting, all the words inside this range will be the qualified ones.
Step 5. The listview of QueryCard will be updated based on the words and weights given and attached to the
TextField.
The following sequence diagram shows how autocomplete operation works:

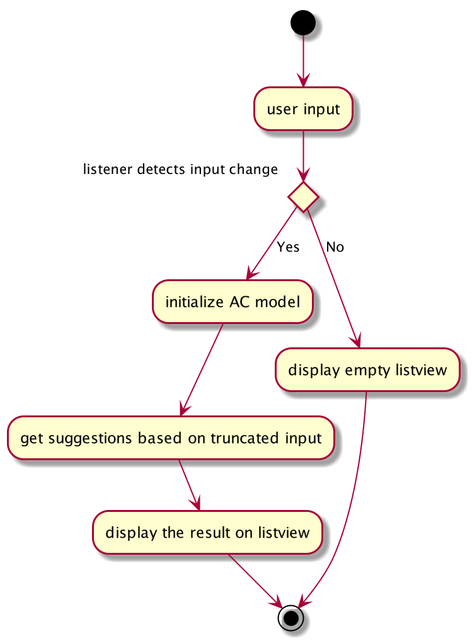
The following activity diagram summarizes what happens when a user enter something new.

Design Considerations
Aspect: How Autocomplete works
In terms of the retrieving suggestion list, an enhanced binary search algorithm is used. Since a word (which represents a autocomplete term) has a name and weight, the default "vocabulary" will be first sort based on weight and for same weight, sort alphanumerically.
In terms of replacing the target term to the TextField, 2 approaches are proposed
-
Approach 1 (current choice): 2 listeners were added. 1) 1st listener for
TextFormatter, this is especially utilised to retrieving the updated cursor position, which is where it outperforms. 2) 2nd listener forTextInputControlto detect the text change ofTextField. Then combined with previously returned caret position, we can replace the corresponding position with target term (the one user selected) -
Approach 2. 1 listener for
caretPropertyis added to detect the change of position of caret (i.e., cursor). This approach is simpler with regard to logic but more complicated during implementation. Since caret position change does not necessarily mean textField change, therefore extra check would be required, also resulting in potential inaccuracy.
In terms of user interaction, different listeners are added for different valid actions (e.g. press TAB, ENTER and navigate using UP and DOWN) to make user benefit by typing faster.
History Feature
Implementation
History is mainly facilitated by CommandHistory with HistoryPointer. When the app starts, a CommandHistory
instance is created and any command executed (no matter valid or not) will be saved to a list of history commands.
And when the user calls the history, the overall history list will display on the resultDisplayPanel. And when
user press F3 and F4 to navigate through the history list, the HistoryPointer will point to corresponding
history.
Similar to Section 3.1, the history displayed on textField is facilitated by KeyEventListener. When the keyinput
event of F3 or F4 is triggered, it will navigate to previous input and next input correspondingly.
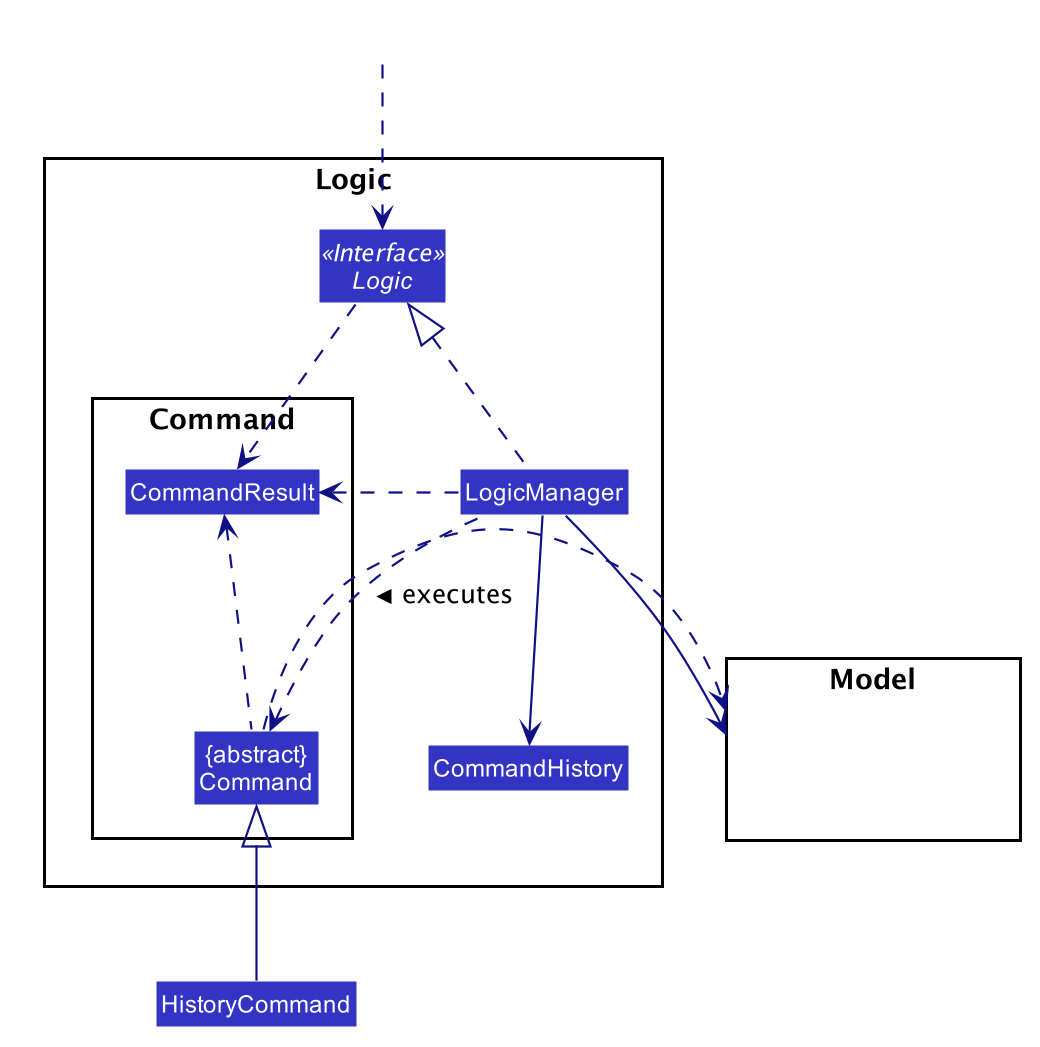
The following class diagram illustrates the interaction between historyCommand and other parts:

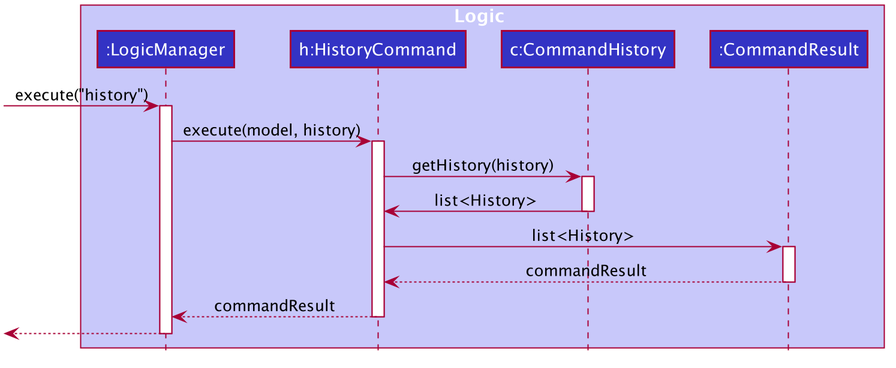
The following sequence diagram illustrates the flow of how history commands works:
